Introduction
When you’re shopping for lab grown diamond jewelry, it’s easy to focus on the center stone’s carat weight and forget the quiet heroes of design: the side stones.
Their size, shape, and spacing can make your center look larger, brighter, and more refined—or unintentionally crowded, dull, and out of balance.
Because lab grown diamonds let your budget stretch further, proportion mistakes can actually become more common: it’s tempting to add “just a bit more sparkle,” and the design crosses that fine line between luxe and loud.
This guide lays out nine practical, mm first principles that help you choose side stones that flatter your center stone beautifully, across halos, three stone rings, pavé bands, and more.
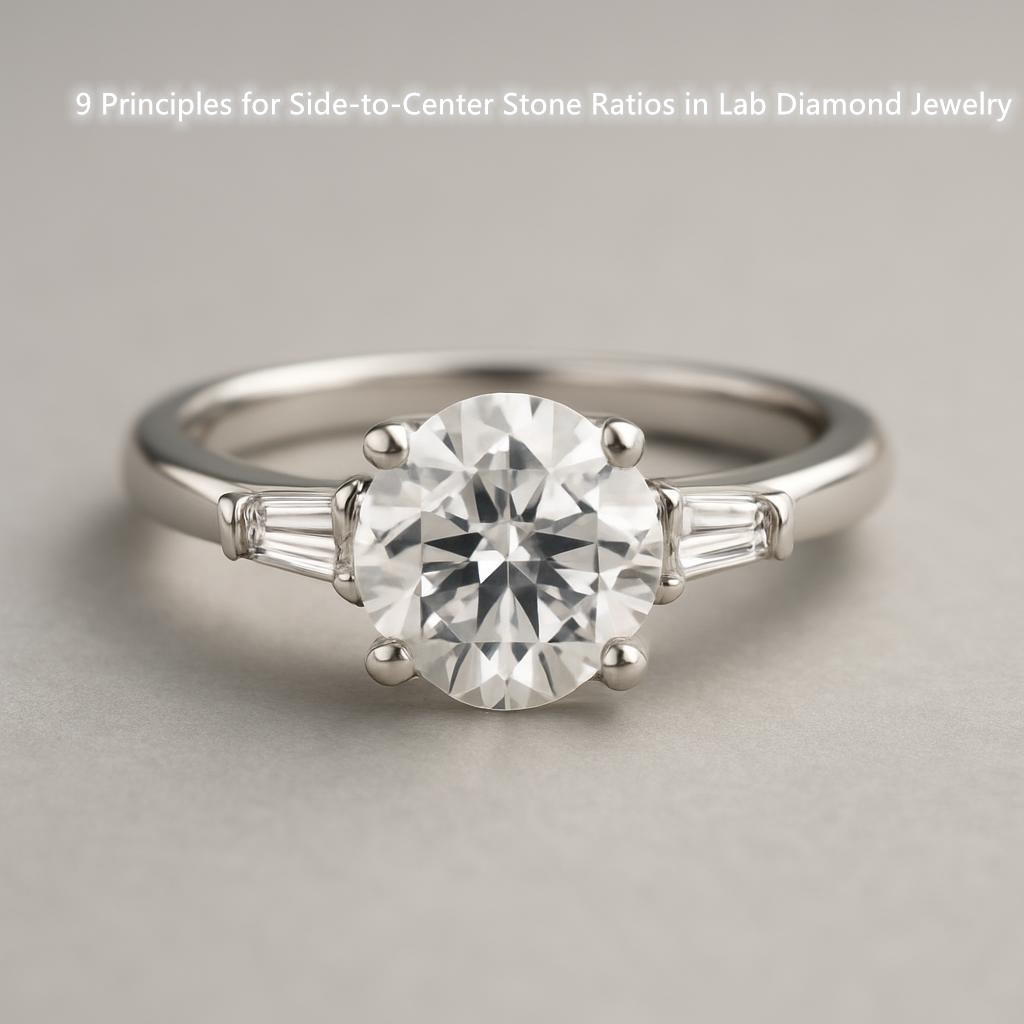
Principle 1 :
Visual Hierarchy—Make the Center Stone the Star Great jewelry has a clear pecking order.
Your ye should land on the center stone first, then gently notice the side stones, then the metalwork. A reliable rule is: side stones should support, not compete.
Quick ratio cues:
· Three stone rings with round sides: each side stone’s diameter at roughly 60–75% of the center’s diameter usually feels luxurious without stealing thunder.
· Pear or tapered baguette side stones: aim for a visual width of about 50–65% of the center’s width; length can be higher because of the taper without reading as too large.
· Pavé on the shank: keep melee small enough that they sparkle like a “texture,” not like a row of mini centers; more on sizes in Principle 5.
Try this:
From arm’s length (about 60 cm), glance at the design for one second.
If your eye pings around to the sides before settling on the center, the side stones are likely overscaled or too contrasting.
Principle 2 :
Millimeters Beat Carats—Size by Face Up Dimensions Carat is weight; your eye sees millimeters.
Two stones with the same carat can face up differently due to cut proportions. Always size side stones by their face up dimensions.
Useful benchmarks for round brilliants (approximate):
· 1.00 ct ≈ 6.4–6.5 mm
· 1.50 ct ≈ 7.3–7.4 mm
· 2.00 ct ≈ 8.1–8.2 mm
Working ratios in mm:
· Three stone (round center, round sides): side diameter ≈ 0.60–0.75 × center diameter.
· Round center with pear sides: pear length ≈ 0.70–0.85 × center diameter; pear width typically ≈ 0.45–0.60 × center diameter.
· Emerald or cushion center with trapezoids: trapezoid width ≈ 0.55–0.65 × center width.
Practical example: With a 7.4 mm round center (about 1.5 ct), round sides around 4.5–5.5 mm feel balanced; pear sides in the 5.0–6.0 mm length range (with proportionate width) keep the center dominant.
Principle 3 :
Dress the Finger You Have—Scale to Hand and Ring Size The same proportions can read very differently on size 4 vs size 8 fingers. You’re designing for the whole canvas.
Guidelines:
· Slender fingers (sizes 4–5.5): keep side stones at the lower end of the ratio; narrower shanks (1.6–2.0 mm) elongate and refine the look.
· Average fingers (sizes 6–7): mid range ratios work well; shanks around 2.0–2.2 mm feel balanced.
· Larger fingers (sizes 7.5+): use the upper end of ratios; slightly bolder shanks (2.2–2.6 mm) prevent the center from feeling “lost.”
Try the tape test: Cut paper circles/pear shapes to actual mm sizes and tape them to a plain band. View from arm’s length and in different lights. If the sides look cramped, scale down; if the center loses presence, scale up the center or simplify side stones.
Principle 4 :
Harmony vs Contrast—Pair Shapes With Intent Shape pairing changes how proportion is perceived. Soft + soft reads fluid; soft + sharp reads dramatic. Both can be beautiful if intentional.
Charts to lean on:
· Round center + round sides: timeless, easiest to balance with the 60–75% diameter rule.
· Round center + pear sides: elegant taper; aim for pears that don’t exceed ~85% of center diameter in length, to avoid appearing wing like.
· Cushion or emerald center + trapezoids: Art Deco crispness; keep trapezoids around 55–65% of center width so the center’s broad facets stay commanding.
· Oval center + half moons or pears: keep side stone height aligned to the center’s shoulder height; too tall makes the outline bulbous.
When in doubt, keep contrast in one dimension only (shape or size), not both. For example, a strong shape contrast (round + baguette) pairs best with a modest size ratio.
Principle 5 :
Light Performance Balance—Sparkle Should Be Textured, Not Chaotic Too large side stones can create competing flashes, making the center look darker by comparison.
You want a rhythm of light: a strong soloist (center) supported by a crisp ensemble (sides and melee).
Sizing cues:
· Micro pavé melee: 1.0–1.3 mm reads as “glitter.” 1.4–1.6 mm reads as “sparkle line.” Over ~1.7 mm, individual stones start to read as “mini centers,” raising the risk of visual competition.
· Channel set baguettes: keep the channel width proportionate to the center; often 30–40% of the center’s diameter feels balanced for rings, thinner for pendants.
· Bead size and metal exposure: let 10–20% of the pavé surface be metal; covering every gap with stones can look heavy and actually dulls perceived brilliance.
Tip: because you can afford better cut at larger sizes, prioritize Excellent/Ideal cut for the center. Side stones can be Very Good without visible penalty in this context, which helps maintain the hierarchy.
Principle 6 :
Halo Math—Thickness, Gaps, and the Illusion of Size Halos amplify size, but only when they maintain clean spacing and proportion.
Rules of thumb:
· Single halo thickness: melee around 1.0–1.3 mm yields an elegant rim; 1.4–1.6 mm reads bolder. Past ~1.6 mm, many halos start to outshine modest centers.
· Total face up size: total diameter ≈ center diameter + 2 × halo thickness + small metal margin (often ~0.1–0.2 mm per side). A 6.5 mm center with a 1.2 mm halo faces up around 9.0–9.1 mm—an impressive but still refined jump.
· Gap control: avoid visible gaps between center and halo; a tight seat or a minimal rim keeps the halo from feeling detached.
Double halos: use a stepped approach—inner halo thinner (e.g., 1.0–1.2 mm), outer halo equal or ±0.2 mm. If both halos are thick, the center can look buried.
Principle 7 :
Three Stone Proportion—A Classic That Loves Restraint Three stone designs are cinematic when the side stones echo the center without copying it.
Reliable recipes:
· Round center + round sides: 1 : 0.5–0.7 : 0.5–0.7 by diameter is elegant. By carat, each side often ≈ 25–50% of the center’s weight, but prioritize mm.
· Emerald or cushion center + trapezoids: keep trapezoid top widths around 55–65% of the center’s width; the side stones should “tuck in” without making the silhouette rectangular.
· Round center + pear sides: pears point outward; length ≈ 70–85% of the center diameter; choose slim, well tapered pears to avoid shoulder bulk.
Set the tilt angle carefully: slight outward tilt of pears/half moons lengthens the hand; too much tilt widens the look. Ask your jeweler to mock up angles before setting.
Principle 8 :
Metal Matters—Frames Change the Story Prongs, bezels, and shank thickness influence proportion as much as stones do.
Pointers:
· Prong scale: for centers under ~7 mm, keep prongs slim and evenly spaced; bulky prongs visually shrink the center.
· Bezel width: 0.6–1.0 mm bezels read refined; 1.1–1.4 mm read bold. On smaller centers, a thick bezel can crowd side stones; balance bezel weight with smaller or fewer side stones.
· Shank width: match shank width to side stone scale. A 1.6–2.0 mm shank with oversized side stones looks top heavy; a 2.2–2.6 mm shank can better anchor bolder sides.
Cathedral shoulders can visually enlarge side stones. If you want a light, airy look, lower the shoulders or taper them more aggressively.
Principle 9 :
Match the Material—Color, Clarity, Fluorescence, and Growth Type Uniformity across stones is part of proportion harmony.
Mismatches can exaggerate side stones or dull the center’s sparkle.
Checklist:
· Color: keep side stones within one grade of the center. If your center is D–F, stick to D–F sides; if it’s G–I, sides in G–I are fine. Warmer metal (yellow/rose gold) forgives slight mismatches better than white metals.
· Fluorescence: match fluorescence levels when possible. A center with no fluorescence and sides with medium strong can look uneven in UV rich light.
· Clarity: side stones can be one clarity step lower than the center (e.g., center VS1, sides VS2–SI1 clean to the eye), especially for small sizes; the eye won’t see the difference, but the wallet will.
· Growth type: lab grown diamonds (HPHT, CVD) can have subtle color tints. If your center is CVD with post growth treatment, aim for side stones from a similar production to keep tone consistent.
Bonus practicality:
lifestyle and comfort Side stones that are too tall or too close to the ring’s edge snag on clothing.
Aim for seats that keep the girdle below or level with the prong tips, and leave at least 0.5 mm of metal between outermost stones and the band edge.
A Fresh, Practical Angle : The Perception Threshold Here’s a trick from product design: at arm’s length, most people can’t detect changes under roughly 0.2 mm in small jewelry details.
So if you’re agonizing between 1.2 mm and 1.3 mm halo melee, relax—prioritize availability, cut quality, and setting precision. Save your scrutiny for changes that exceed 5–10% of a dimension; those are the differences you’ll actually notice in daily wear.
Practical Sizing Recipes
· Solitaire (center with delicate pavé band): choose a 6.5–8.2 mm center, pavé melee 1.0–1.3 mm, shank 1.8–2.0 mm. This keeps the center in control.
· Halo with hidden halo: main halo 1.1–1.3 mm; hidden halo stones 0.8–1.0 mm to avoid bulk under the gallery.
· Round center 7.4 mm + pear sides: pears 5.2–6.0 mm length, slim proportions; angle pears to continue the arc of the center, not to widen it.
· Emerald center 8.0 × 6.0 mm + trapezoids: trapezoid top width 3.3–3.9 mm (≈55–65% of 6.0 mm); height aligned with center’s shoulder line.
Conclusion
Proportion is the quiet language of taste.
In lab grown diamond jewelry, where your budget can easily push you into larger stones, these nine principles keep your designs elegant: protect the visual hierarchy, choose by mm, scale to the hand, pair shapes with intent, balance the sparkle, do the halo math, respect three stone restraint, tune the metal frame, and match the material.
When you follow them, your center stone shines brighter, looks larger, and feels timeless—exactly what you wanted from the start.